The Divi theme library is a powerful tool that can help you save time and streamline your website design process.
 One of the key features of the Divi library is the ability to create global rows. Global rows are essentially modules that you can reuse throughout your website, and any changes you make to the global row will automatically be reflected on all pages where the global row is used. In this article, we’ll take a look at how to use the Divi theme library to create global rows that display one source of content on multiple pages.
Step 1: Create Your Initial Content
The first step in creating a global row is to create your content. This could be anything from a call-to-action (CTA) module to a Tabs module to a pricing table or a contact form. For the purposes of this tutorial, we’ll implement a Tabs module that will be displayed on multiple pages. We needed to repeat that information in multiple places on the website, while still keeping it consistent. The solution is to use the Divi library capacity for globalized elements that are deployed in multiple pages. One change is seen in all the places where the Divi element is deployed.
To create a new Tabs module, go to the Divi Builder and click on the green plus button to add a new module. Select the “Tabs” module from the list of available modules.
Once you’ve selected the Tabs module, you’ll be taken to the module settings page. Here, you can customize your Tabs module to your liking. You can change the title, text, button text, and button URL, among other things.
Once you’ve finished customizing your Tabs module, save the module by clicking on the green “Save & Exit” button in the bottom right-hand corner of the screen.

Step 2: Save the Tabs Module to the Divi Library
Now that you’ve created your Tabs module, the next step is to save it to the Divi library. To do this, hover over the Tabs module in the Divi Builder and click on the three vertical dots in the top right-hand corner of the module. Select “Add to Library” from the dropdown menu.
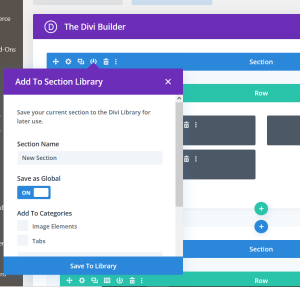
This will open the Add to Library dialog box. Here, you can give your Tabs module a name and description, as well as choose whether to save the module as a global module. Make sure the “Make Global” checkbox is selected, and then click on the green “Save to Library” button.
Step 3: Add the Global Row to Your Pages
 Now that you’ve saved your Tabs module as a global module in the Divi library, you can add it to your pages. To do this, go to the page where you want to display the Tabs module and click on the purple plus button to add a new module. Select “Add From Library” from the dropdown menu.
This will open the Divi library. Here, you’ll see all of the modules and layouts you’ve saved to the library. Find the Tabs module you just created and click on the “Insert” button.
Once you’ve added the Tabs module to your page, you can customize it to your liking. However, any changes you make to the module will only be reflected on the page where the module is used.
If you want to make changes to the Tabs module that will be reflected on all pages where the module is used, you’ll need to edit the global module in the Divi library.
Step 4: Edit the Global Module in the Divi Library
 To edit the global module in the Divi library, go to the Divi Builder and click on the three horizontal lines in the top left-hand corner of the screen. Select “Divi Library” from the dropdown menu.
This will take you to the Divi library, where you’ll see all of the modules and layouts you’ve saved. Find the Tabs module you want to edit and click on the “Edit” button.
This will place the Tabs module in the Divi Builder.
